Two professionals looking at drawings

Digital Banking

On this page:
  • Staying on top of your business's finances has never been easier
  • Download the Citizens Bank Mobile App
  • Special tools just for businesses to maximize cash flow
  • Get started and learn about the most popular Digital Banking tools


Online Banking + Mobile App

Together, they're Digital Banking from Citizens Bank.

 
At Citizens Bank, we bring you more ways to get business done, and at any hour of the day - because we doubt you just work from 9 to 5.
 

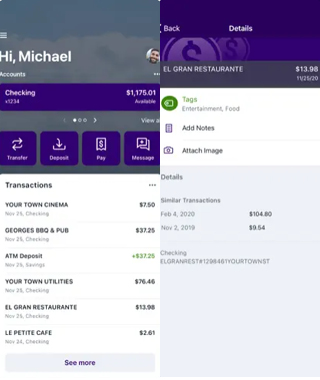
Citizens Bank Mobile App screenshots

Digital Banking Features

Customizable Dashboard
You decide what gets priority on your screen. Put balances, transactions, payments, transfers, and messages in any order.  

Debit Card Controls
Temporarily lock your card or set alert preferences, spending limits, or restrictions.
 
Payments
Send payments from anywhere to anyone with our Bill Pay function.  
 
Electronic Documents
Store your monthly statements and account notices securely for access anytime. 
The Citizens Bank Mobile App is available in the App Store for Apple® devices and in Google Play for Android® devices. Search for Citizens Bank-WI or just tap a button below to install the app today. 
 
Apple app store badge
Google play store badge

Maximize your cash flow with Citizens Bank’s digital tools just for businesses.

As a business manager or owner, you know just how important it is to keep tabs on the money flowing in and out of your company – and to maximize the availability of funds while also preventing fraud. Explore our full suite of services just for businesses and let our team of experts suggest a plan that is custom built for your operations.


This is how you do it.

Looking for step-by-step instructions on how to complete tasks in Digital Banking? You've come to the right place.
Step 1: Enroll for Digital Banking
Establish a user name and password on the new user enrollment screen.
 
Step 2: Download the Citizens Bank Mobile App
For those logging in with a mobile device
Search Citizens Bank-WI or use the App Store or Google Play links above.
 
Step 3: Log in with your Digital Banking credentials
Log in to the Mobile App or via Online Banking on the website using your user name and password. You may be periodically prompted to update your password.
 
Step 4: Enter your verification code
You'll be asked to provide a phone number (mobile number preferred) to receive a verification code via text or call. This process helps us authenticate you to ensure secure access.
 
Step 5: Complete the process
You'll be asked to accept a new user agreement. Mobile app users will also set up a 4-digit passcode plus an optional biometric option.
You can create one-time transfers, future-dated transfers, and recurring transfers between Citizens Bank accounts.
 
  1. Select an option.
    • Select Transfers from the main menu, then select Make a transfer (above the calendar), or
    • Select Transfer in the quick actions section of the dashboard.
  2. Select the account you want to transfer funds from, and then select an account for the destination (the 'To' account).
  3. Enter the transfer amount.
  4. Follow the steps for what you want to do:

I want to: Steps
Create a one-time, immediate transfer Select Submit.
Create a one-time, scheduled (future-dated) transfer
  1. Select More options.
  2. Leave Frequency set to the default 'Once'.
  3. Select the Date field.
  4. Select a date for the transfer if you want something other than 'Soonest available'.
  5. Select Submit.
Create a recurring transfer
  1. Select More options.
  2. Change the Frequency field.
  3. Select a date for the repeating transfer to start.
  4. Select Submit.
 
TIP: If your transfer is an immediate, internal transfer, you can add a memo note by selecting More options and completing the Memo field.
  1. From the Dashboard or Accounts section from the main menu, select an account.
  2. Select Alert preferences.
  3. To set balance alerts, select '+Add alert' on the Balance tab, enter your desired amount, pick your notification method, then select Add alert.
  4. To set transaction alerts, select '+Add alert' on the Transaction tab, enter your desired transaction type and amount, pick your notification method, then select Add alert.
To add a new payee:
 
  1. Select Payments from the main menu.
  2. In the Payments section, select '+ New payee'.
  3. Select an option.
    • Select Add a bill (to pay a company).
    • Select Add a person (to pay an individual).
  4. Complete the fields to create a payee, then select Submit.
  5. When prompted for your password, enter it and select Submit.
 
The new payee appears on the Payments screen with a payee Details screen that appears when the payee is selected.
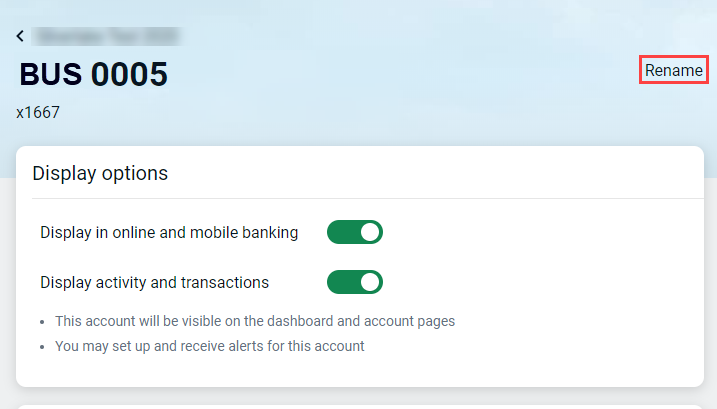
Call it like it is by giving your accounts names that make sense to you.
 
  1. Select an account from the Accounts section on the dashboard, from the Accounts screen, or from the Accounts section in the general Settings screen.
  2. If you're on the account detail screen, select Settings. If you're on the general Settings screen, select the institution and then select the specific account you want to manage settings for.
  3. Next to the account name, select Rename.

    Business account showing display items

  4. Type the new name, and then select Save.
  1. Scroll down on the Dashboard screen to the Card management section.
  2. Select the appropriate card you want to manage.
  3. To temporarily lock a card so it can't be used for transactions, select the green toggle button, then select Lock card.
  4. Select Alerts and protection to set alert preferences, spending limits, and restrictions based on location, merchant type, or transaction type.